This article will cover how to setup an NDI® and NDI®|HX decoder using a Windows PC. A word of caution that while offering a lot of flexibility this solution is operating on Windows and thus can fall victim to common Windows woes.
If you are looking for a rock solid NDI® Decoder there are some excellent options available that are purpose built to serve you needs without worry.
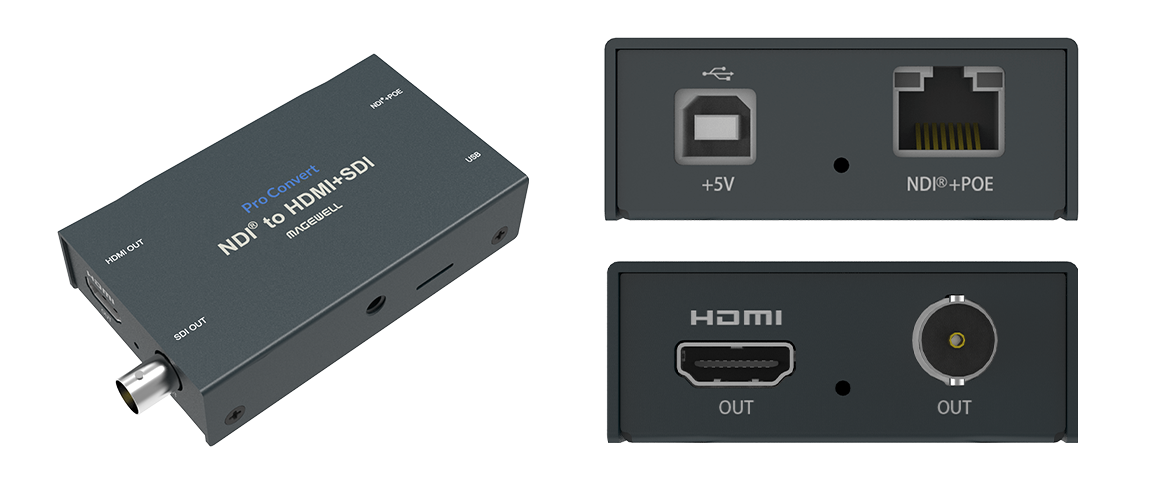
Shown is an example of an NDI® to HDMI or SDI Decoder available from Magewell
We’ll discuss the basic setup for your own NDI® & NDI®|HX Decoder with remote control capabilities using a Windows 10 PC and appropriate resources.
Please note that you can utilize any Windows PC compatible with the NDI® Tools to accomplish our goal but that you will find that it limits the quality of the incoming stream that can be supported depending on the processor, memory, GPU and more.
We should now connect our PC to our network using a hard wired network connection. Connect the HDMI output of the PC to a local display and a USB keyboard and mouse to an available USB port to continue setting up our decoder.
- Turn on the PC and once fully booted up, logged in and the network connection is active open a browser and navigate to the freely available NDI® Tools to download the necessary software.
- Install NDI® Tools on the PC and, for peace of mind, restart the PC after the installation has completed.
- Once the PC has finished rebooting using the Windows start menu locate, or search for, “Studio Monitor” which we’ll focus on configuring next.

Now we will configure Studio Monitor to go full screen on a specified display, to start with windows, to always be on top of other content, allow audio to come out of the display speakers and finally enabling remote access.


- If you right click anywhere in the video window you’ll be greeted with a menu offering source selection and application settings.
- For now let’s click on the “Settings” option to begin configuring our decoder.
- In the “Application” option let’s click to enable “Run at Windows Start” that may have a Windows Prompt you need to accept before Studio Monitor will be capable of launching at startup.

Next let’s enable remote control access by selecting the “Web Control…” option making sure to note the URL shown to access the control interface at a later time.
- If you would like Studio Monitor, when blank, to display the remote access configuration URL on the connected display, you can also click “Screen Web URL” just keep in mind that anyone with this address, and who is on your network, can remotely control that instance of Studio Monitor unless password protection was enabled during NDI® Tools installation.
We now have a Studio Monitor configuration set to run at Windows Startup and to offer us remote access control over what is being displayed.
Let’s now focus on routing audio to the display.
- In Settings and then Audio we need to tell Studio Monitor where it should play back the received audio. Simply select the available audio output associated with your display and the audio will be defaulted to that output.

If needed, do not forget that you can increase the audio gain using the +0, +6, etc… options as available below your audio output selections in the event the audio level isn’t quite high enough.
Now let’s explore the Video Settings options to make sure nothing interferes with displaying our content properly or with interference.
- Typically I will disable all options with the exception of “Enable HW Acceleration” to ensure nothing is interfering with my content and that we are using the PC to its fullest potential.

Note: if you are tempted by the “Lowest Latency” option, it will, in a sense, be dropping frames in favor of achieving the lowest possible latency and thus should only be utilized if you are willing to accept the potential loss in quality of smoothness.
We have just a few final steps to perform before we’re ready to begin using this as an NDI® or NDI®|HX decoder.
- If we navigate to the Output Settings section we’ll set a dedicated monitor for full screen display of content, enable scaling so all content fills the screen as best as possible and finally tell Studio Monitor to always be on top.

- In the Output Settings let’s first select a monitor to be dedicated as our full screen NDI® output. You may only have a single option to select at which point it will make itself fullscreen on that display.
- Next select the “Scale Video to Window” option to ensure that our content is always sizing itself appropriately for our monitor.
- Finally let’s tell Studio Monitor to be “Always on top” which will help to suppress other software from interfering with our displaying content.
- When using a Windows PC for displaying content in public areas it is often advisable to also disable Windows Notifications so the “time to update” pop-ups and more do not interrupt your sessions.
- At this stage we should now have Studio Monitor displaying itself full screen on your monitor and ready for us to begin remotely controlling the displayed NDI® source(s). Do you remember that URL we noted down before? Well, now, we’re going to put it to some good use.
From almost any device with a modern web browser, that is on the same network as this PC acting as an NDI® or NDI|HX decoder, you simply need to enter that URL into the browser and you’ll be greeted by the remote control interface for that instance of Studio Monitor. This is an easy way to change the displayed content on one or many instances of Studio Monitor that are active on your network using a simple web browser.

- In the example shown above you’ll see that you can select any NDI® Source that Studio Monitor discovers as the main content feed as well as enabling PiP and selecting the PiP source, muting the audio, changing the dedicated full screen monitor and even offering the ability to initiate and end a local recording!
- If you select an displayed NDI® Source from the drop down list it should shortly begin displaying on your monitor. As you switch to different sources, you should see the content on the monitor change accordingly.
You have now successfully setup and configured a DIY NDI® and NDI®|HX decoder based on a Windows PC. Congratulations!
Some additional aspects to consider as you look to deploy this solution...
- If deploying more than one (1) of these we may want to consider allocating static IP addresses to the PCs to make reaching the remote access web interface reliable… otherwise the IP address could change preventing you from remote controlling Studio Monitor until you can find what new IP address the PC has been assigned.
- If you would like to utilize an overlay of graphics or information you can enable this either from the web interface or via the Settings and then Overlay options where you can choose between PiP, Picture in Picture, or alpha channel overlay for your additional NDI® content to be displayed alongside your main feed.
- If your PC happens to have dual monitors, or more, you can utilize multiple instances of Studio Monitor, each dedicated to a specific display, to create multi-monitor solutions from a single PC!
- The last suggestion that I will make is that you would like to gain Windows level remote access and control that the “Scan Converter” application, included with NDI® Tools, offers remote viewing and keyboard / mouse control through an instance of Studio Monitor! We’ll cover this topic in particular in more depth at a later time.
As-Tested Software Review:
NDI® Tools v4.1 (Free)
As-Tested Hardware Review:
Intel ComputeStick CS325
Pluggable USB3-E1000 USB Network Adaptor
I utilized an Intel ComputeStick CS325, featuring an m3 processor, that has shown itself capable of decoding a 4K@60 NDI® signal when provided with a hard wired network connection via a USB to Ethernet adaptor (not included w/ CS325).
Please note that you can utilize any Windows PC compatible with the NDI® Tools to accomplish our goal but that you will find that it limits the quality of the incoming stream that can be supported depending on the processor, memory, GPU and more.
As I mentioned above to achieve the highest quality and lowest latency we want to hard wire the PC to our network. Ideally we want to use a USB 3.0 10/100/1000 USB to Network Adaptor as NDI® feeds can utilize a lot of bandwidth.
If you choose to utilize the wireless features of the PC you may find yourself limited to a 1080@60 stream, or less, depending on the wireless connection quality.